Whether you’re chasing a new Boston Qualifier time or aiming to break the 3-hour barrier, Higher Running Coach Sage Canaday shares his top three tips to help you run a faster marathon.
Tip #1: Build Higher, Consistent Mileage
The number one principle? Consistent aerobic base mileage. Many runners need to hit 50–60 miles per week—or even up to 100K—to reach their full potential. But it’s not about going fast all the time. You build up gradually, with slower-paced, easy mileage. That aerobic foundation is key to long-term improvement.
Tip #2: Add Quality Speed Work
Once your base is solid, it’s time to layer in speed. This could be as simple as 6 x 20-second strides, or more structured workouts like:
800m repeats
Kilometer or mile repeats
Tempo runs at 10–20 seconds per mile faster than your marathon goal pace
These workouts help make your goal pace feel smoother and more efficient.
Tip #3: Manage Life Stress Outside of Training
Training isn’t just about running. Ask yourself:
Are you getting enough sleep?
How’s your diet?
What’s your work/travel/family stress like?
When I ran my marathon PR of 2:16, I admit my diet wasn’t perfect. I had some pizza, Taco Bell, and even some beer here and there—but I was sleeping 9–10 hours a night and fully committed to the training lifestyle!
Final Thoughts
Factor in all aspects of your life when building your training plan. Consistency, quality workouts, and recovery are all part of the equation.
Running is Life Long! In today’s article we will go over the training considerations for “master age” runners, but for the younger folks, this article is also useful to help prepare you for the next chapter in your running adventure. Something we should touch on now before diving into detail is the typical life stressors folks between the ages of 40-60s can face. Often, we longingly reflect on our ability to simply sleep off a minor injury or a hard training session from our teens or 20s. Something we may not consider is raising families, providing elder care, rent/mortgage. The list goes on and on. Simply point, your body isn’t failing you, there is most likely a lot on your plate that requires extra recovery considerations.
Control the Variables! Obviously, these will apply to all runners, but the needs do magnify a bit as we get older. We must prioritize sleep the best we can. Even an extra 30 min a few nights a week is impactful. Quality food to help bolster recovery and ward off micronutrient deficiencies is also critical. The same goes to regular blood work to keep on top of things.
As we enter our middle-aged years, we may need to find a good OBYGYN and/or Endocrinologist to support our hormonal changes. We won’t dive too much into Hormonal Replacement Therapy (HRT) in this article. This is best discussed with a medical provider.
Keep your shoe rotation fresh and make friends with a few simple recovery tools, like afoam roller. These little things do add up and assist in keeping us injury free.
Strength Training! Yes, we are starting with this because there are a few key exercises we can program into our training plans to help mitigate age-related tendon degradation and muscle loss. The biggest thing that we lose as we get older is tendon stiffness and strength, particularly the Achilles tendon. Knowing this ahead of time, we can focus a bit on safely doing heavy lifts to load the tendons and some basic plyometric exercises. We focus so much on glute power (as we should), but a lot of our stride length is dictated by calf strength and Achilles stiffness. As we age, we compensate with a little bit of a higher cadence but shorter stride. Protecting stride length protects our ability to maintain higher paces. One thing to note about Achilles stiffness: this means the tendon should be like a coil. A strong coil is stiff and can transfer energy. This doesn’t mean we should be running with tight ankles. We want those to be mobile.
Key things to incorporate into your strength plan: heavy single leg calf raises and bent calf raises. Isometric calf raise holds (hard for 30sec at a time). In general, lift heavy (but safely)..Bulgarian split squats are a great exercise to include. You can try 3–4 sets of 5–7 reps for strength, or 2–4 sets of 12–15 reps for muscle endurance. Start with bodyweight to dial in good form before adding load. For plyometrics, double leg bunny hops are a great start and then progress to single leg bunny hops. To continue the progression, jump squats with a medicine ball and jump down from a box into a half squat and then immediately into a squat jump will do wonders for both bone and tendon strength. Lastly, see if you can set up a camera/phone to record your lifts or have a friend film you. Take note of left/right asymmetries. If lifting is new for you, a journal of things you notice while lifting is good. For example, if you feel less coordinated at the bottom portion of a Bulgarian split squat, and your back is not as engaged, one of the glutes may not have the same power as the other side. Another sneaky one is a stronger foot. Watch for your ankle/foot to roll a bit outward or inward at the top of a calf raise. Big toe mobility is huge with this one. Your ankle will do a lot to compensate and spread the load elsewhere if the big toe cannot bend properly.
Training Considerations! Hills are your friend. Short hill strides 1-2x a week help with power development and running form. They are also a continuation of the tendon strength we want to preserve as we age. Now the good news: our endurance ability does not really decline but our power and threshold can. This is great news because when it comes to intensity, a little bit goes a long way. Simply the hill strides and some shorter intervals on the track really can ward off age related decline. Of course we want to maintain endurance. As we age, we may need to spread out intense sessions just a bit more than in our 20s or 30s but we can hop on a bike or an elliptical to maintain our endurance. Our heart and lungs do not know the difference. It is ok to be creative and substitute a run day with a cross-training day. Particularly, if it allows you to have a very good speed or threshold session. Sacrificing a little bit of general running to preserve a workout is almost always worth it.
Another tip that comes from my cycling days is “big gear work.” I found I could help with late ride fatigue and build functional power by doing intervals that involve pushing a big gear at a low pedaling cadence (requires more torque from the legs). This could be perfect for a runner, returning from injury, who is ready to workout but is not 100% ready to return to running. It is ok to adapt workouts and do them on a bike or an elliptical. Thriving as a Master Runner
Nutrition and Supplements! Fuel is important! Simple as that. We must, regardless of age, give our body the fuel it needs to participate in the activity we ask it to do. Protein right after a workout can be helpful, but research shows what matters most is getting enough throughout the entire day. https://pmc.ncbi.nlm.nih.gov/articles/PMC7400240/ A lot of athletes have been exploring creatine to help with maintaining muscle strength, hydration status, and cognitive function. Creatine has been around and used by body builders for decades, but a resurgence and diversification of its uses has been prevalent this past year. Women seem to come up with a bonus and respond positively to creatine supplementation. This may be because they have lower creatine stores in their muscle tissue. This is a supplement, not a requirement of course. If you’d like to try creatine, it is always safest to consult your medical provider and if you choose to try it: 3-5g per day is a safe starting point for most people.
Philosophy and the Mental Game! With a bit of planning and staying informed, we can run rather close to our abilities from our 20s and 30s. Having said that, we should also note peak performance will change over time when we enter our golden years. A decline in our relative speed and ability to cover distance is, perhaps, more technically correct, but our running is simply evolving to the phase of life in which we enter. Comparison to one another is the thief of joy and can hamper our own journeys. The same can be said of comparisons to a different version of ourselves. Don’t forget to enjoy this sport for what it can before us: health, travel, closeness with nature, companionship, decompression, and the list goes on! We should always be grateful for our mobility and our sport. Live in the moment. Control what you can control and try not to stress the rest of it.
When they do, it’s a good idea to check in on key areas like nutrition, hydration, sleep, and stress levels. For example, if you ate your usual amount after a long run instead of slightly increasing your intake to match the extra effort, that could leave you feeling off. Similarly, a few nights of poor sleep or an increase in life stress can also take a toll on your performance and recovery.
All of these factors can quietly add up and impact how you feel on your runs. That’s why it’s worth pausing to see if any of them can be adjusted or improved. But if everything seems in check and it was just one tough run in the midst of many good ones, try not to overthink it—chalk it up to a blip and focus on setting yourself up for a better next run.
However, if you start to notice a string of difficult runs, it may be time to take a closer look. That could mean backing off your training a bit, getting a blood test to check for things like iron levels, or consulting with a healthcare provider to rule out anything more serious.
If most of your other runs have been good, don’t put your focus on one bad run. You’re not losing fitness. Shake it off, be supportive of yourself, and set yourself up to feel better the next day!
Learning to Listen to Your Body with Help from HRV
Learning to listen to your body is an essential skill for every runner, but it’s not always easy. Sometimes your mind tells you to push through or stick to the plan, even when your body isn’t quite ready. You might wake up feeling fresh, only to realize mid-run that your legs are still fatigued from a previous effort. Or maybe you’re just feeling a little off and aren’t sure if it’s worth adjusting your schedule. In those moments, tools like Heart Rate Variability (HRV) can help you make more informed decisions.
What is HRV?
Heart Rate Variability is the measure of the variation in time between each heartbeat. Rather than your heart beating like a metronome, there’s natural variation. HRV is typically measured in milliseconds and reflects how well your autonomic nervous system is functioning, especially the balance between the sympathetic (fight or flight) and parasympathetic (rest and digest) branches.
A higher HRV generally indicates that your body is in a more relaxed, adaptable state, able to handle stress and recover well. A lower HRV can signal fatigue, illness, emotional stress, or overtraining.
HRV can also help reveal which lifestyle habits are helping or hurting your recovery. For example, prioritizing sleep and managing stress often lead to higher HRV, while things like alcohol, poor sleep, or prolonged stress can contribute to lower values.
How to Track HRV
You can measure HRV with wearables like WHOOP or the Oura Ring, but you don’t need expensive gear. The HRV4Training app is a budget-friendly and scientifically validated option that uses your phone’s camera or a heart rate monitor.
One potential downside of HRV4Training is that you see your HRV score immediately after taking the measurement. In contrast, with WHOOP or the Oura Ring, you can go about your morning routine, reflect on how you feel, and then check your data later which may help avoid jumping to conclusions based on the number alone.
For accurate information over time, it’s important to measure HRV the same way each morning. A reliable approach is to sit quietly in a relaxed position shortly after waking up, ideally before eating or having caffeine. Sitting offers a good balance of sensitivity to stress and recovery, making it a solid option for most people tracking training and readiness. A consistent routine to follow is to wake up, use the bathroom, then sit comfortably in a chair to take your HRV measurement.
Use HRV as a Guide, Not a Rulebook
HRV can be incredibly helpful for recognizing trends and making informed training decisions, but it’s also important not to let the data take over your decision-making. Some runners fall into the trap of letting HRV dictate every single training choice, which can create anxiety or unnecessary second-guessing.
Use HRV as one piece of the puzzle, alongside how your body feels, your sleep quality, your mental state, and the demands of your current training cycle. Think of it as a conversation between your data and your intuition, not a final verdict. You lead that conversation by checking in with yourself and asking, ‘How am I feeling today?'”
Ignore HRV Readings Before Races
It’s also smart to avoid checking your HRV the morning of a race. Race-day nerves, poor sleep the night before, or travel stress can all temporarily lower HRV even if your body is ready to perform. Seeing a low number might shake your confidence or lead you to second-guess yourself. Trust your training, go through your normal pre-race routine, and skip the HRV check that day. The data can wait.
What to Do with HRV Trends
One of the best ways to use HRV is by tracking trends over time rather than reacting to a single day’s reading. For example:
Sample HRV Trend Patterns and What They Might Mean:
3+ days of noticeably lower HRV than your baseline Your body may be under high stress. It might be a good time to reduce volume or intensity, prioritize rest, or swap in a cross-training or mobility session. At this point, you likely wouldn’t get the desired benefit from doing a speed workout or long run.
Sudden drop after a hard effort A normal acute response to training. Consider keeping the next 1–2 days lower intensity to help recovery.
Consistent, high HRV with good energy and motivation Likely a green light to maintain or slightly increase training load if that aligns with your plan. As Marco Altini, creator of HRV4Training, says: “I tend to always stress its utility to hold back, more than to push harder.” In other words, a high HRV doesn’t mean it’s time to go wreck yourself in a workout, but it may be a good window for a productive speed session or long run.
HRV is stable, but you feel off or have low motivation Use how you feel to guide decisions. HRV is helpful, but not perfect. You know your body best.
Final Thoughts
HRV can be a powerful tool for learning to listen to your body more effectively helping you spot patterns, adjust training before issues arise, and learn what truly supports your recovery. Just remember, like any tool, it works best when used with context and care.
Hello Higher Running Family! Coach Rachael here and we have an article for you that may be of some interest for those of us who are now being thrusted into summertime training! The long, beautiful days do come with one notable challenge……heat! Training in the heat can lead to some wonderful fall/winter performances but we must be careful to stay healthy while our bodies take on the additional load of both cooling us while staying dedicated to our day-in and day-out training. That leads us to today’s topic of using a sauna to help the body better adapt to heat.
What are Saunas (hint there are multiple)!
Dry Sauna:this is a traditional sauna people will most readily find at their local gyms, YMCAs, etc. The temperature typically ranges between 150-185F (65.5 – 85 C) and the relative humidity is low 10-30%.
Infrared Sauna: a type of “radiation” that is also dry but at a lower temperature ~120-150F (49 – 65.5 C) and reportedly produces a more direct body heat. They are gaining popularity.
Wet Sauna or “Steam Room”:these are also typically not as hot as a regular sauna BUT they are very humid as the name indicates.
What Does the Research Say:
Something that should be noted about studies is their potential limitations. Sometimes data can be “self-reported” and, even with the best of intentions, this can lead to data error. Secondly, it is very costly to do long studies with numerous participants. Another consideration is individuals who have been training for a long time and do not opt to participate in studies that require deviation from their normal routine/training methods. The data in less experienced runners will show significant improvements because they are not close to their “genetic ceilings” while individuals who have been training a long time may show more subtle changes. With that said, these studies are still worth our time!
One study (cited below) showed very promising results by breaking up participants (both men and women) into two groups. One group received a dry sauna protocol while the others did not. They were given the same testing protocol at the beginning and then again after the seven-week study. What is particularly interesting is that they tested the participants at a particular blood lactate level: 4 mmol of lactate (30-minutes effort on a treadmill). Peak core temperatures and heart rate were lower in the group that received the sauna protocol and who also ran at a faster pace in their second test. The group that did not receive the sauna protocol did not show the same improvements.
It is believed that some of these adaptations occur from a positive change/increase hematocrit and hemoglobin levels (these are beneficial blood profile markers). Bonus! There are other noted health benefits to sauna, but for the purposes of this article, the athletic side is being discussed.
What Have I Personally Noticed:
I have been getting into a sauna 2-3 times a week for the past month, typically, after workout sessions. The sauna is rather dry and is about 170F (76.6 C). The first time I stepped into the sauna, I had to remind myself to take a few deep breaths (I have only ever stepped foot in a sauna once or twice in my whole life) and then I calmly sat for 20 minutes. I admit this was probably too long for the first session. Interestingly, it took me almost half the time I was there to get a noticeable sweat rate. During the second sauna session, I sweated much sooner (within a few minutes). My sauna sessions since then have been about 25 minutes.
NOW for the good part! Just a few days ago, I had a 5 x 1-mile repeat workout. The temperature was about 75F (24 C) and humidity was around 85%. Just a nasty day! Now that I have years of running under my proverbial belt, I know that I struggle in the heat and really pull back paces in the summertime. So, an average of ~6:20 minutes per mile pace for the 5 reps would have usually met expectations in a heat adjusted sense. However, I split 6:03 down to 5:52 which made that one of the best ever performances in the heat ever. Those paces were assigned without adjustment. Needless to say, I could not believe it when the paces were hit. I won’t lie, halfway through the final mile repeat, I was feeling the heat and effort, but this was a huge victory. The recovery time was about 2:15 – 2:20 minutes between each one. I started sweating early on during my warmup and sweated a bit more while working hard and this was desired. It is ideal to sweat a bit earlier to keep the body’s core temperature lower, but the heat adaptation occurs when the body may not need to sweat “as much”. I did go to the sauna right after this workout.
Now here is the thing: the gains will not be exponential from the sauna. There is an upper limit to how much the body will assimilate the benefits of the sauna and translate that into faster splits, lower heart rate at lactate threshold, etc.
Going forward, I plan to continue using the sauna about 2 times a week to maintain the newly acquired heat adaptation. The sauna is another training stimulus of sorts, and I will be watching for fatigue levels and adjust accordingly. Just like speed workouts and long runs, this is an additional stress to the body, and I will always put recovery first. If a sauna session needs to be missed, then that is ok!
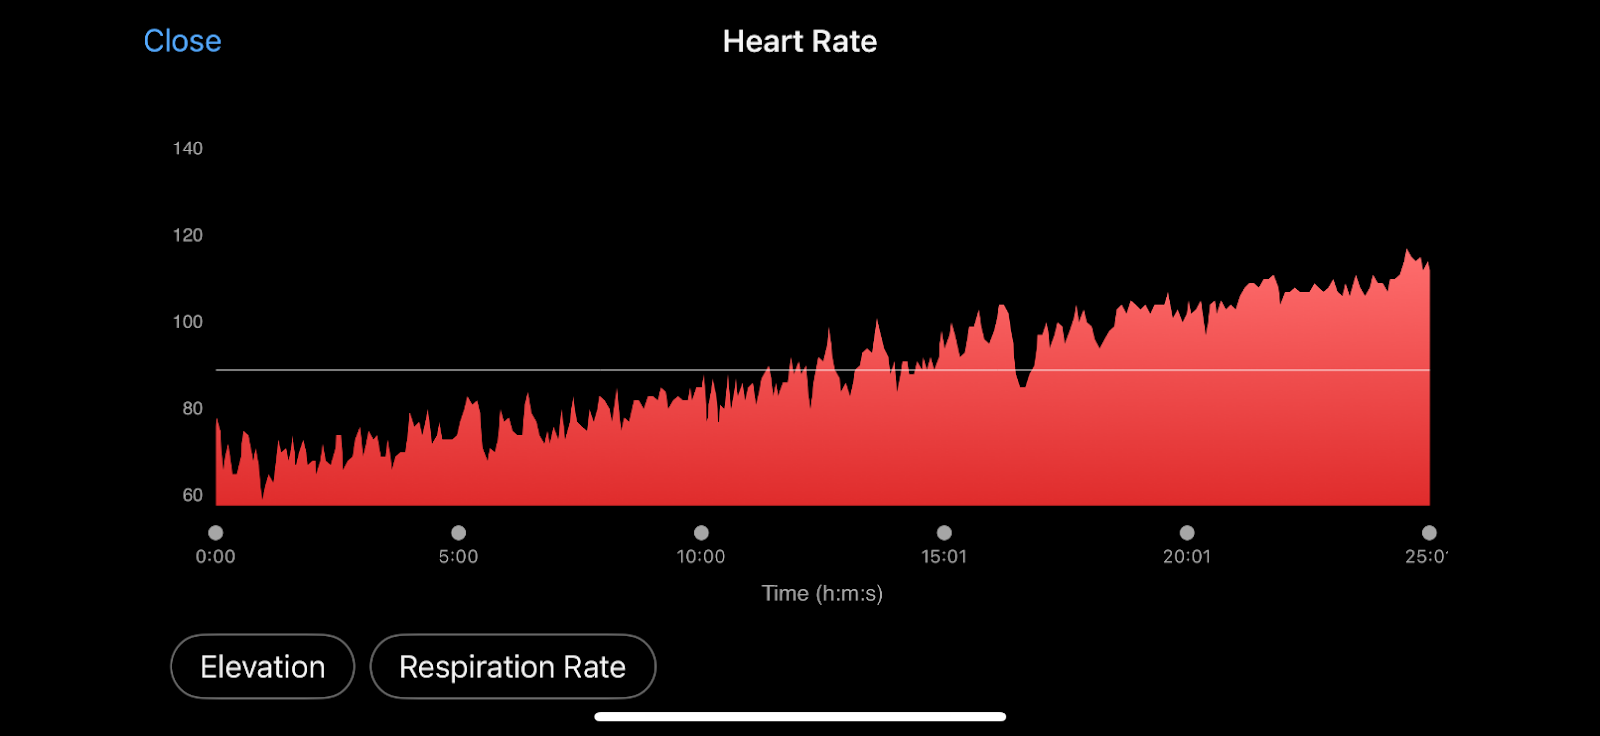
Now onto an explanation for the below image! I usually do not bring electronics into the sauna, but this time, I used my running watch and chest heart rate monitor strap to record the heart rate during a 25-minutes session. As you can see, my heart rate crept up the whole time, and it correlated with sweating and the sensation of getting hot. Around the 10-minute mark, I was sweating noticeably and at the end of the session, I had sweat “pouring” off me. I felt a bit uncomfortable around the 20-minute mark but perfectly safe to go the last 5 minutes. For context, this sauna session was after an 11-mile run which was a workout (8 x 800 meters and 2 x 200 meters intervals).
How to Implement, Cautions, and Who Benefits:
Please consult with your doctor if you have any concerns utilizing a sauna. While the sauna is well tolerated, there are certain medical conditions in which using a sauna is not advisable. For those who elect to use a sauna, hydration is very important! Not only do endurance athletes have to re-hydrate from their runs, but they also need to account for the sauna. Those prone to anemia/low iron stores, are well served paying special attention to their blood work. Lastly, please consider your total training volume. If the sauna proves to be too much of a stressor, it is arguable that more damage may happen than the modest gains from sauna exposure. Furthermore, if you are in the biggest block of training and only a few short weeks away from a major goal race, I personally would not recommend sauna exposure. A notable exception to this could be for athletes who are going to race in much hotter conditions than their current climate. Heat adaptations from the sauna can happen within just a few sessions and it would be a benefit provided the athlete monitors their recovery. The runner may need to scale back on intensity just a bit to make space for sauna sessions. Key take away: stay in tune with your body! There does not seem to be any need to go more than 4 times a week to the sauna. 2 times a week will also give benefits. If the sauna is completely new to you, 5, 10 or 15 minutes for the first session works just fine. Most protocols do not go past 30 minutes. After 30 minutes, I think the principle of diminishing returns comes into play as more hydration and recovery is required. Work the time up carefully and consider adding another day instead of long sauna sessions. The sauna is most effective if done very soon after completing a run.
The climate we live in could also indicate who gets the biggest gains from a sauna protocol. If someone is living in a cool climate and has opted for an early spring marathon in a warmer climate, this would be a great example of someone benefiting much more than a person already training in less-than-ideal conditions. Blood plasma volume (a marker of someone’s body prepared for heat) for someone who lives in Texas is, arguably, built up a bit more in early spring than someone from the far north. Therefore, the person living in the north could “play catch up” and build their blood plasma volume. Again, using a sauna should be done with caution and build up the time in the sauna gradually.
To summarize, I believe sauna training has a place in one’s training! Please let us know if you have used a sauna and what you noticed with your own running!
Sauna Alternate Options
Saunas may not be accessible for all individuals, or some folks may be traveling and do not have access to a sauna but want to gain or retain their heat adaptations. Well, you are in luck! There has been some attention paid to using hot water as a stimulus to raise the body’s core temperature. Around 100F for water temperature is ideal and stay in for roughly the same amount of time as would be done in a sauna. The key to water submersion is making sure the torso and arms stay in the water. Ideally, the entire body up through to the neck is best. The same benefits have been found with water submersion as compared to sauna: lowering of the core temperature, an increase in blood plasma volume, and muscle relaxation.


 Tip #1: Build Higher, Consistent Mileage
 Tip #2: Add Quality Speed Work
 Tip #3: Manage Life Stress Outside of Training
 Final Thoughts